For any coach to have an idea about whether their players’ physical fitness abilities are at the standard required for the benefit of the team or are improving, it is important to have a baseline of data to refer back to.
During my time coaching mens football teams, I have used a variety of methods to test the players’ physical components of football (soccer) performance at the start of pre-season and during the season. The information gained has been useful in determining if these physical attributes were improving through the season or not.
Physical component tests that can be used on football (soccer) players to determine their current physical performance capabilities:
- Beep test
- Cooper test
- 40m sprint test
- Vertical jump test
- 1RM test
- Reach test
- T-test
Whilst these are great tests to utilise, it is important that we understand exactly what is being tested and how to execute the tests in the correct way.
So in this blog post I would like to share with you the following:
- What physical component each test assesses
- Equipment needed
- The procedure of each test
- How to find the test score
Note: Before any test is carried out, clearly explain the procedure of the test to the players and all relative information should be recorded, for example:
- Name
- Age
- Height
- Weight
- Weather condition (day of testing) if testing outside
Beep Test
The Beep test is a commonly used fitness test used at all levels of the game. It can also be known as:
- Bleep test
- Multistage fitness test
What physical component does the Beep test assess?
The Beep test examines the aerobic capacity of an athlete.
What equipment is needed for the beep test?
- Cones
- Measuring tape/wheel
- Non slip surface
- Recording document
- Beep test audio
Procedure
Using cones or tape if available, mark out 2 lines that are 20m apart.
Players will start on one line and on the first beep, the test will begin with every player repeatedly running to the opposite line and back.
Players must try to arrive at each line at the same time as the beep. Not before; not after. If a player arrives too late at one of the lines then they must drop out.
If a player just misses the beep once, use your discretion once and let them continue in case it was simply a missed timed run. However, if they do not make it in time at the next line then the player must drop out.
Likewise, if a player arrives on the line early, they must wait for the beep before continuing.
The speed of the beeps starts slowly, 8.5km for level 1, and after a certain amount of repetitions the speed increases slightly with each level.
Score
The player’s score is the level and the number of shuttles that are actually completed, not including the failed shuttle run.
Below is a guide to what constitutes a low or high score.
Advantage of the beep test: It can be used for a large group of players with very little equipment needed.
Disadvantage of the beep test: If the test is executed outside, this means that weather conditions may influence the outcome.
Cooper Test
The Cooper test was designed by Kenneth Cooper in 1968 and remains a popular fitness test to this day.
What physical component does the Cooper test assess?
The test examines the aerobic capacity of an athlete and can be used to estimate the VO2 Max of an athlete.
What equipment is needed for the beep test?
- 400m track
- Cones (to mark each 100m)
- Stopwatch
- Whistle
Procedure
Players begin at the start line, on the track. On the coach’s whistle, the players travel around the track as many times as possible by foot for 12 minutes.
Walking is allowed but athletes must aim to complete as many laps as possible within the 12 minutes.
Score
The first score to record is the number of metres completed. After this, the distance in miles or kilometres can be worked out using the following equation:
Miles = metres x 0.000621 or kilometres = metres ÷ 1000
From these scores you can estimate an individual’s VO2 maximum using the calculation below:
VO2 max = (35.97 x miles) – 11.29 or VO2 max = (22.351 x kilometres) – 11.288
Advantage of the Cooper test: The test and estimated calculation can be done without the need for any expensive equipment that is used in scientific labs.
The test can also be done with multiple athletes taking part at the same time.
Disadvantages of the Cooper test: The weather can influence an athlete’s performance.
40 yards Sprint Test
The 40 yards or 37m sprint test is a simple test to perform that will demonstrate the player’s running speed.
What physical component does the 40 yard sprint test assess?
The 40 yards (37m) sprint test will demonstrate the player’s running speed utilising the anaerobic alactic capacity.
What equipment is needed for the 40 yard sprint test?
- Measuring wheel / tape
- Flat surface
- Cones or tape (to mark out the start and finishing line)
Procedure
Athletes will position themselves on the start line and on the coaches whistle, they will run through the finishing line before decelerating (make sure there is plenty of room to slow down after the finish line).
The athletes should perform the test twice, with a significant rest period in between.
Score
Record the time of the two sprints and calculate the average to produce the score.
Vertical Jump Test
The vertical jump test or the Sargent jump test (Sargent, 1921), was developed by Dudley Allen Sargent.
What physical component does the vertical jump test assess?
The vertical jump test measures the maximum muscular power (high-speed) of the legs.
What equipment is needed for the vertical jump test?
- A smooth wall (no ceiling restrictions)
- A flat, nom slippery floor
- Chalk
- Measuring tape or stick
Procedure
The athlete must cover their fingertips with chalk before standing sideways against the wall, leaving a gap of 15cm between the wall and the athlete.
First, the athlete should reach as high as they can and make a mark on the wall with the hand that is chalked. Secondly, the athlete must lower the arm, flex the knees (no moving the feet) and hips whilst swinging the arms backwards and forwards whilst executing a jump.
The athlete must touch the wall at the highest point of the jump, with the chalk making a mark on the wall.
Score
The score is the distance between the two marks on the wall (highest reaching point and highest jumping point) in a vertical line. Use the best score out of three attempts for the final result.
Advantage of the vertical jump test: advantages for this type of test is that there is no need for a lot of equipment, it is simple to conduct and since there is no need for recording anything during the execution of the jump, the athlete can perform and record the results by themselves.
1 RM Test
The 1 repetition maximum (RM) test is generally used with slow speed muscular strength exercises and is commonly used amongst strength and conditioning coaches.
What physical component does the 1 RM test assess?
1 RM is assessing the maximum strength of a muscle
What equipment is needed for the 1 RM test?
This will depend on what muscle(s) are being tested so for this example we will look at the squat exercise.
- Barbell and safety locks
- Sufficient weight plates of various weights (1.5km, 2.5km, 5km and 10km) that will accumulate enough load for the strongest athlete.
- A squat rack
- A flat, non slippery, solid surface to stand on
Procedure
Demonstrate to the athlete how to perform a squat with a barbell. Two spotters need to be positioned at the side of the barbell, one either side, and perform the squat with the maximum weight predicted.
If the weight was not correct, make sure the athlete has plenty of recuperation time (5-6minutes) before repeating the exercise with the correct load.
Score
The result is simply the maximum weight lifted that the athlete was able to lift.
Disadvantage of the 1 RM test: Only one athlete at a time can be tested. The test must be overseen by someone with experience of estimating the 1 RM of each individual as well as having access to specialised gym equipment.
Sit and Reach Test
The sit and reach test was developed in 1952 by Wells and Dillon.
What physical attribute does the sit-and-reach test assess?
The sit-and-reach test examines the lower back and hamstring flexibility.
What equipment is needed for the sit-and-reach test?
- Measuring tape
- Tape
- Alternatively a sit-and-reach box
Procedure
Use the tape to stick the measuring tape (measuring stick) to the floor, whilst also placing a 61cm long piece of coloured tape horizontally across the 38cm line.
The athlete must sit down with the measuring tape between the legs, 0cm end nearest to the body. Heels are placed flat on the floor (shoeless) and on the tape that is set on the 38cm line. Also spread the feet out wide so that they are 30cm apart.
The athlete must reach forwards slowly, always keeping both hands alongside each other and not one in front of the other. As the individual is stretching, they must place their head in between their arms and then exhale as they reach as far as they can.
The best score out of three attempts is recorded as the player’s final testing result.
Note: During a warm-up, use non ballistic stretches (stretches that do not involve any bouncing).
Advantage of the sit-and-reach test: Not a lot of equipment and no specialised equipment is needed.
Disadvantage of the sit-and-reach test: If the ankle position is not considered when using a reach box, the results may not accurately show the flexibility of the lower back and hamstrings.
T-Test
This test is simply known as the T-Test due to the shape that the cones make when the test is set up.
What physical attribute does the T-Test assess?
The T-Test assesses the agility of a player which includes the capability to stop, start and change direction as quickly as possible, in a controlled way.
What equipment is needed for the T-Test?
- Tape measure
- Large cones
- Non-slip flat surface
- Stopwatch
Procedure
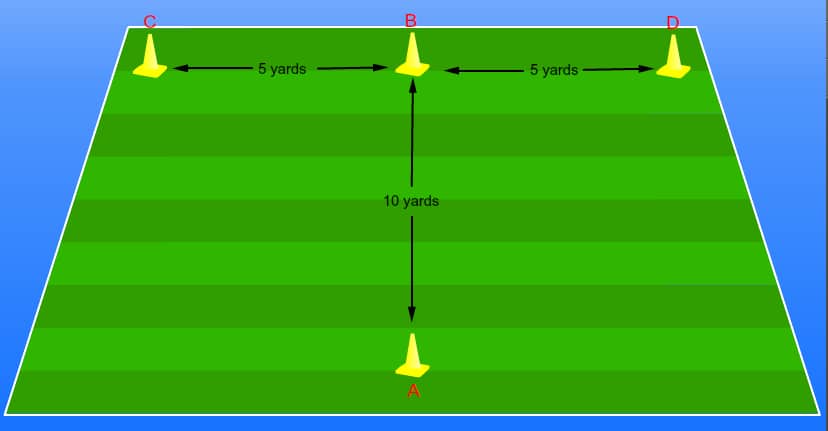
Place the four cones in the shape of a T with the distances as shown in the image below.

The athlete begins at cone A. When the signal for commencing the exercise is given, the player will run forwards to cone B, touching the top of the cone with the right hand.
Then the athlete will shuffle sideways to touch cone C with the left hand before shuffling right to touch cone D with the right hand.
The player shuffles left again, this time touching cone B with the left hand and then runs backwards to cone A.
Players should perform the test twice with the best time used as their final result.
Note: If an athlete does not touch the top of the cone, cross their feet when shifting sideways or is not facing in the correct direction then that particular test attempt is not valid.
Advantage of the T-Test: Minimum equipment needed and very simple to set-up.
Disadvantage of the T-Test: The use of a stopwatch might not be as accurate as an electronic timing device.
There are many other methods of testing. If you would like to know about alternative physical component testing then the remainder of this blog will explain these methods which are listed below:
- Magaria-Kalamen Test
- Standing Long Jump
- Illinois Agility Test
Margaria-Kalamen Test
The Margaria-Kalamen test was based on the Rudolf Margaria test and adapted by J. Kalamen.
What physical attribute does the Margaria-Kalamen Test assess?
The test challenges the maximum muscular power, at high-speed, using the anaerobic alactic.
What equipment is needed for the Margaria-KalamenTest?
- Staircase with at least 9 steps, roughly 18cm in height
- 6m space in front of the steps (flat surface)
- Tape measure
- Stopwatch
- Weighing scales
Procedure
Before the test is performed, the athlete is weighed, using the scales, and each step is measured to calculate the elevation from the third to ninth step (6 x step height).
To begin the test, the athlete will start 6m away from the first step. When ready, they will sprint towards the first step and run up the stairs, three steps at a time (first step being the third step).
Repeat this 3 times but make sure the athlete has 2-3 minutes of recovery time in between each attempt.
The time between the third and ninth step is recorded and rounded to the nearest 0.01 second.
Score
The power in watts is calculated using the formula below.
Weight (pounds x 4.45 or kg x 9.807) x height (of the third step to the ninth step in metres (inches x 0.0254)) ÷ time
Power = (W x H) ÷ Time
Standing Long Jump
The standing long jump can also be known as the broad jump and was an athletic Olympic event until 1912.
What physical attribute does the standing long test assess?
Like the vertical jump, the standing long jump examines the maximum muscular strength (high-speed) of the legs.
What equipment is needed for the standing long jump test?
- Premarked broad jumping mats are available to buy
Or you can use
- Flat area to jump
- Tape measure
- Coloured tape
- Chalk or marker pen
Procedure
Create a starting line with the coloured tape, on the floor. The athlete will stand with both feet on the floor, toes just behind the starting line.
The individual will swing their arms back and forth before jumping forward, as far as they can and landing on their feet. Repeat this three times and use the best score out of the three.
Score
Mark the floor where the back of the foot landed (if one foot is in front of the other, mark the heel of the foot furthest back) and then measure the distance from the start line to that mark.
Illinois Agility Test
The Illinois agility test is a commonly used method of testing as it requires very little in terms of equipment.
What physical attribute does the standing Illinois agility test assess?
As its name suggests, the agility of an athlete is assessed.
What equipment is needed for the Illinois agility test?
- A flat non-slippery surface
- 8 large cones
- Stopwatch
Procedure
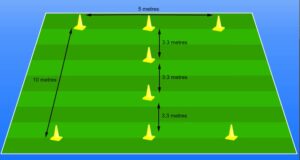
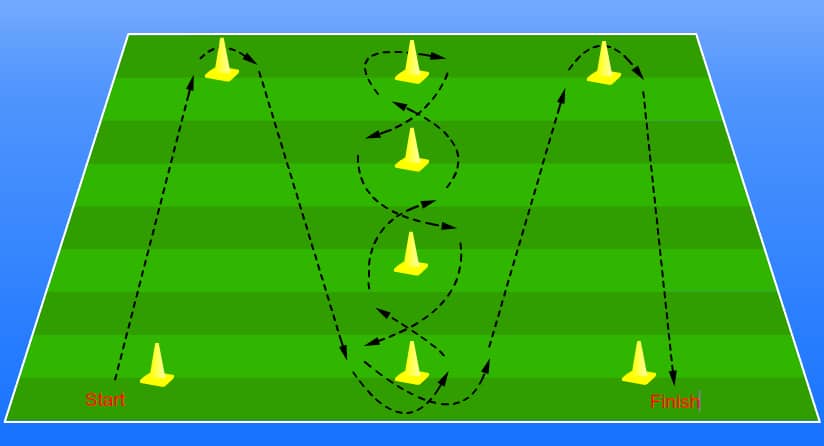
The cones are laid out as seen on the image below.


On a predetermined signal, the athlete will run around the cones in a specific direction (refer to the image B) as fast as they can with the time being recorded.
Score
The athlete should complete the trial 3 times, making sure they have a good recovery period in between (3-5 minutes). Use the best time out of the three trials.
