Over many years of preparing football teams for a game, I have tried and used many different warm-up drills whilst keeping the same fundamental principles of how a player should warm-up.
In general, a standard football (soccer) warm-up will contain the following aspects:
- Psychological preparation
- General and specific dynamic stretching
- Static stretching
- Passing and control drill
- Possession game
- Finishing
To help football coaches prepare their team for success, I’ve developed a step-by-step guide that will get your players primed and ready for the game!
I am going to discuss why and how the aspects in the above list should be performed during a warm-up. Also, I will include other tips that you will find beneficial along with a complete example (with visual diagrams) of a warm-up routine.
Step 1: How to use a psychological strategy in a warm-up
Whilst the majority of people think of the warm-up starting when the players step onto the pitch, you can begin the preparation inside the changing room. At least from a psychological perspective.
Stick with me on this…
You will often hear sports psychologists speak about the benefits of imagery and many coaches on Twitter or LinkedIn will retweet or share the article with a like. However, how many times have you actually used a psychological strategy with your players?
Several studies (1) have shown the positive effects of visual imagery that have contributed to increased levels of performance.
Visual imagery may be carried out by the players sitting down with their eyes closed and imagining themselves playing in the game. As they do this, you can guide them through specific scenarios that you would like them to visualise.
Example: ask the players to imagine that the opposition have possession and we (the team) are set-up in our defensive shape. Tell the players that the ball has just been switched to the left winger. Now ask the players to imagine the team shifting across and seeing the position that they must take up (as practiced in training).
This would be like the physical session on the training ground except this takes place in the mind and begins the players focus on the game.
Now I realise that perhaps this will feel strange at first, for players and coaches alike. My team and I felt the same way when I first introduced it, but their response was a positive one and after a while it will not feel so weird.
Step 2: How much time does the team need to warm-up
Give yourself 40 minutes before kick-off. This will give you plenty of time to prepare the players correctly, without having to rush & push the players too quickly too soon.
Trying to speed through the warm-up due to lack of time can lead to injuries.
As well as allowing 40 minutes before kick-off, plan to have 5 minutes between the end of the warm-up and the start of the game to enable the players to return to the changing rooms. This will provide them with a bit of time to make any last minute adjustments as well as giving you the opportunity to give some last minute tactical advice or motivation.
Step 3: How to begin the Warm-up
When the players finally step out onto the field, it is important to have everything in place so players are not hanging around or striking balls at goal.
Tip: After you have given your team talk, allow the players some free time whilst getting changed which will enable you to set up the warm-up before the players step out.
The first step is to begin with a gentle 2-3 minute jog, just to start the process of increasing the body temperature. After this, the players will form a large circle and perform a number of dynamic stretches that will aim to prepare all the muscles needed to play the game.
Step 4: Progression stage
Following this, a simple exercise of control and passing, in two’s, is performed. This can also include some volleys and various controls using different parts of the body along with some dribbling at a low intensity. The emphasis for this exercise is on getting a feel for the ball and getting a rhythm going for good control.
Next, the players will line up in two lines and perform some football specific dynamic movements at an increased intensity. These movements may include:
- Heel taps
- High knees
- Lateral movements
- Zig-zag (forward & backwards)
- Sprints
Now to include high intensity cognitive work. We do this with two small rondos (square size 2 x 2m) of 4v1 and one touch. The defending player stays in the middle for a set amount of time, 30 seconds.
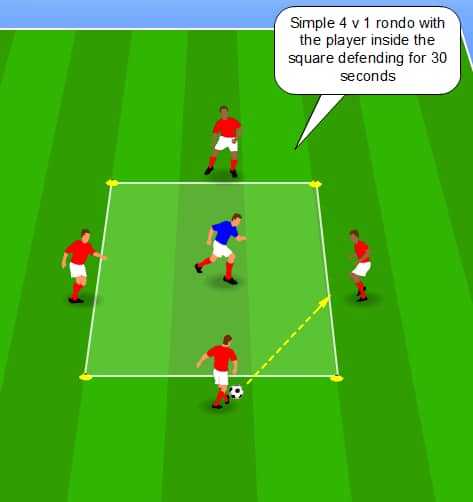
Make sure you have plenty of balls available to feed into each square if a ball has been kicked away. Players are only working for 30 seconds so we do not want to lose time waiting for a ball. After 30 seconds, change the person in the middle.
This is great for making those quick decisions of where to pass the ball and really gets the players engaged in focusing on many aspects of the game, such as:
- Communication
- Reading the play quickly
- High levels of concentration and technical performance (body shape and passing with control, for example)
Step 5: Static stretching
When each player has completed a turn as a defender in the rondo, make sure to give the players a small water break and a little free static stretching time so that they can stretch whatever they feel they need to.
Remember, we are preparing the body, not trying to fatigue the players.
Make sure that the static stretch (for each muscle) is no more than about 8-10 seconds long and not the standard 30 seconds. This is due to long periods of static stretching, before an activity, can lead to muscle fatigue and therefore resulting in a decreased performance (2).
Step 6: Coordination
Next is the speed ladders. Here we are focusing solely on individual coordination as they execute a variety of footwork patterns through the speed ladders.
By doing this exercise one at a time, this gives the players time to recover before it is their turn again. Also whilst we are looking for quick feet, greater emphasis should be placed on the quality of the coordination movement.
Step 7: Competition
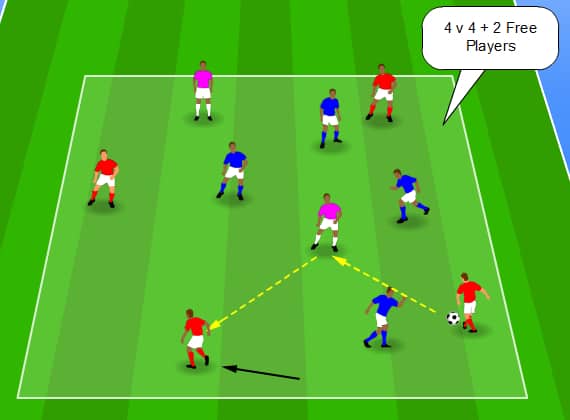
Now we come to simulating a game situation by using a possession drill. In this drill we will have a 4v4+2 situation in a 15m x 15m area. Players will have a maximum of 3 – 2 touches. The drill will be performed for two minutes (x2) with a 3 minute rest in between.
The time can be adapted depending on the weather. I have adapted this for the warm weather in Spain but if you are in a colder climate, you might want to change the time ratios so that players are not getting cold.
After the possession game has finished, make sure that players are given time to recover and drink water before moving to the next stage of the warm-up.
Step 8: Specific work
Each week, before a game, there might be a tactical aspect that you want to practice. This will help to ensure that the players are fully focused on how to perform their roles within a specific aspect of the game from the very first minute.
For this example I will be working with the defensive line (back four), making sure the defenders are tuned in well together, using good communication when shifting side-to-side, executing the pressing and cover balance.
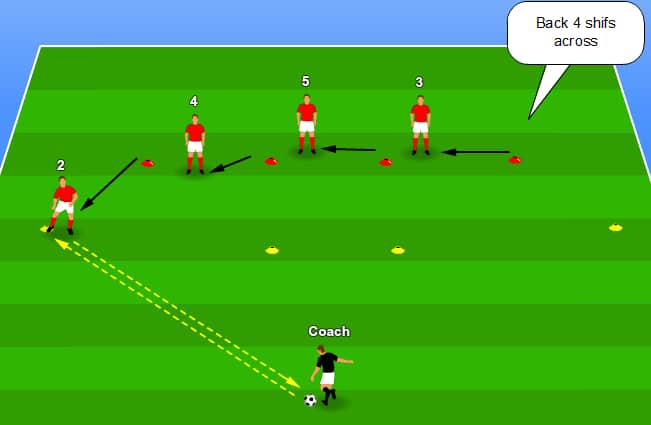
During the time working with the defenders, the midfielder and attackers will take part in a shooting drill.
Step 9: Final phase
So the players are about ready to return to the changing rooms to make those last minute adjustments. Just before they do, we need to perform some reaction speed work.
In two’s, side by side, players are on their toes waiting for the command “GO!” players simply sprint 5 metres the first time and 10 metres the second time.
Job done! Final few words in the changing rooms and time to enjoy the game, hopefully!
Thank you for taking the time to read this blog and I hope it gave you some ideas to warm/up your team.
Reference:
(1, 2) Robert, S Weinberg. and Daniel Gould. (2015) Foundations of sport exercise and psychology, Human KineticsChampaign
